Monday, June 10, 2013

"Tie" Dyed Eggs - a Pin Review


Original Pin:  http://pinterest.com/pin/203154633162729662

Materials List:

  • Silk - scarfs, ties, fabric
  • 1/4 Cup white vinegar
  • water
  • Pot for boiling water

The Steps:

  1. Cut up ties or fabric so that each egg can be wrapped. 
  2. Use a twist tie or string to hold the fabric on the egg
  3. Wrap with a another piece of fabric, such as piece of sheet or t-shirt
  4. Put eggs in pot and cover with water
  5. Add vinegar
  6. Bring to boil
  7. Wait 20 minutes, then place eggs, still wrapped, somewhere to cool
  8. Unwrap eggs and ooh and ahh. 

My Notes: 

Before I started I actually blew the eggs. The original blogger doesn't do this (and I think blowing them may be a reason mine didn't look as awesome - I'll explain later). If you want to blow the eggs first so that you can keep them as lifelong treasures I highly suggest getting this kit from Ukrainian Gift Shop, Inc. I have had mine for about fiver years and I use it often for Pysanky. 


1. Cut up ties or fabric so that each egg can be wrapped. 

  • I purchased two of my ties on Etsy for $4.98 (two on left) and one on Amazon for $2.00 (on right). I know Goodwill usually has these for less, but I checked my Goodwill twice with no luck. I think I live in a small enough farming town that rayon still prevails. 


  • I learned quickly that using a tie is very time consuming. All of these had filling and rayon fabric inside so cutting them apart while trying to conserve as much fabric as possible took about half an hour. Also, I was only able to cover two eggs fully for each tie. This is because the skinnier part just isn't wide enough to wrap around an egg so I ended up having to wrap "the long way" thereby using three times as much of the tie as I thought originally. 
2. Use a twist tie or string to hold the fabric on the egg.
  • The blogger says to save time with twist ties. I used some turkey twine I had leftover from Thanksgiving. This worked fine for me and I think it helped keep the fabric tighter on the egg. I tied solid knots so did have to cut the string once the eggs cooled (step 8). This process took about another 20 minutes (including step 3 below) - I had six eggs I was working with 
3. Wrap with a another piece of fabric, such as piece of sheet or t-shirt.
  • This is were I think my project fell apart. I forgot to get another piece of fabric but luckily my ties had all come with some type of rayon insert so I had enough to use! BUT - I think that this fabric was actually too lightweight. Because I had blown my eggs first they floated in the water (steps below). I think having a fabric that would have absorbed the water (like cotton) would have helped keep them under water. Next time I would stick with cotton fabric. 
4. Put eggs in pot and cover with water
5. Add vinegar
  • As noted above, my eggs floated in the water/vinegar mix. I used a plate to push them under water, but I was also worried about the fabric burning against the pan's bottom so I moved them around a lot as they were coming to a boil. 
6. Bring to boil

7. Wait 20 minutes, then place eggs, still wrapped, somewhere to cool
    • I allowed eggs to boil for 20 minutes even though the were blown. I figured this was a tested amount of time to get the eggs colored. 
    8. Unwrap eggs and ooh and ahh.
    •  Granted the original blogger didn't say specifically to ooh and aah but looking at her egg results and the many vibrant colors I was prepared to - my eggs were not eggseptional though. They were all muted colors. Nothing exciting. hmm. 

    Lessons learned:

    1. Next time I would start with a length of fabric instead of a tie. It may be more expensive, but having enough fabric to do a dozen eggs instead of two eggs would be worth the cost. 

    2. Have a friend help! Knotting string around an egg twice is really boring work. 

    3. Use a heavier fabric for the outside cover - something like cotton that will actually absorb the water/vinegar mix. 

    4. I had a lot of white/blank space on my eggs. This is because the fabric didn't touch these parts. I think this all stems from the lighter eggs. Air got trapped between the egg and fabric, but because the egg was so light I couldn't get the air out and therefore the fabric didn't touch. 

    5. The colors, I believe, were also very muted because of the light egg syndrome. I kept having to move the eggs around in the pot. They never had a real chance to steep (and add the aforementioned air between the fabric and egg and blah is the result).

    6. Be very careful when choosing the cloth or ties. Just because a tie says "100% silk" don't mean they actually are! I know?! The two ties I bought from Etsy were marked as 100% silk, I special messaged the seller to confirm this, but the silver and blue stripes on one and the silver dots on the other were not silk. Because of this these were blank space on the egg.


    7. If your fabric is woven with two different colors on each side, try both sides. They can turn out very different!  

    8. If you decide to use blown eggs be careful when unwrapping! Just because the outsides are manageable doesn't mean the hot water that is inside the egg has cooled at all!

    Conclusion:

     It is pretty amazing that someone figured out how to do this and I see a lot of potential. I will try using regular eggs to see if my "weight" hypothesis is accurate. I suggest giving it a go! You never know what you may "un-tie." 

    Tuesday, April 2, 2013

    Mission Accomplished: Kitchen, Pantry, Hall Closet

    You've most likely caught on that I work a weird shift rotation. This past week I worked four days - eight hours each day. Then I get my mini-vacation as part of my five week rotation. This amounts to Friday, Saturday, Sunday, and Monday off. I will go back to work at 5:30pm on Tuesday for my more "normal" 12-hour shift. Jealous?

    This weekend was beautiful here in the Pacific Northwest. We easily made it to the high 60s. I even have a touch of cheek burn to prove it! I worked in the yard a lot, went a hike (we live next door to a state park) and got bit by the purge bug - finally! I sometimes wish I was a Type A personality so I could make a plan and do it. Instead I make a plan and need to wait until I feel ready to do it. Procrastinators unite. 

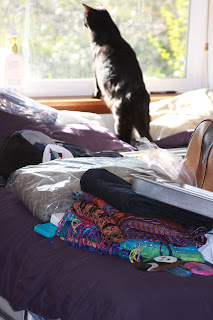
    Yesterday I was able to tackle the infamous hall closet from *heck*. I literally pulled out every last box, bit of junk, and threw it on my bed. Then systematically I decided what I would keep and what would go (donate, trash, freecycle). I must say I was pretty darn happy with my results. I ended up with a large box for a Girl Scout Troop's yard sale (all their stuff was stolen!) and I also ended up with a lot of space!

    The scary before shots:


    I love that the crutches are right next to the exercise equipment... tells a lot about me. 

    AND...after


    Just a smidge of the junk I got rid of (and no, the cat was not harmed in the cleaning of this closet). 


    Oof! That tired me out so I cleaned the kitchen cupboards and the pantry today. 

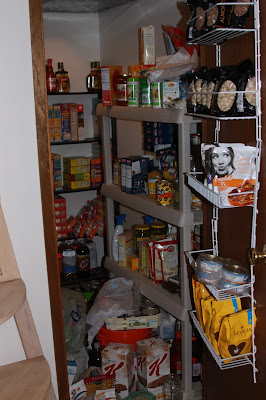
    I tackled the kitchen and pantry with a modified "Peter Walsh" approach. I had kept one whole cupboard just for my baking stuff - since I might need to bake a cake or cookies, oh, never. Just like the voice in Field of Dreams I heard "if you move it to the pantry you will have more space and be less tempted to each chocolate chips out of the bag." My beau and I are working to lose weight so the next thing I thought I would do it create a "snack" cupboard, but instead of the junk that we usually have jammed onto the shelves only healthier treat and snacks would be allowed (plus a space for pasta). 

    Step one - Sweep and mop kitchen and dining room floor (No, this was not procrastination! I didn't want to set my food on a dirty floor while I organized.)

    Step two - pull EVERYTHING out of the cupboards trying to group like items as I go (i.e. all the baking items, all soups, all not-good-for-you treats)

    Step three - wash down all shelves

    Step four - put it all back. 
    • *HOLD-IT*  - Here's where the work came in. I realized that having three shelves in one of our cupboards made stuffing things in the back super easy. I removed a shelf so that it was easier to see everything (more light, more vertical room). This cupboard became the snacks, salad, and pasta location:


    Pretty awesome huh?

    Now, to make sure everything was grouped (no stragglers) I also pulled out everything form the pantry. Here's what I've been fighting with for the past few months:


    You can't see the floor and yes, soup and light bulbs go together.

    I think there is a Valentine's Day gift for my mom somewhere in this pile. 

    Where's Waldo?

    And now my moment of triumph, the before AND afters, together again!


    And the best part?

    Three large boxes for the Stanwood Camano Food Bank!

    My cat "Peach" is pretty darn proud!


    Thanks for going on this tour with me. I haven't felt this accomplished in a long time. It is motivating and fulfilling! Sadly, I go back on shift Tuesday night so I am sure I will lose some momentum but fingers crossed that come Friday (my next day off) I can kick it back into high gear and start the next horror task - the bathroom...

    Saturday, March 30, 2013

    Does This Clutter Make My Butt Look Fat?

    Does This Clutter Make My Butt Look Fat?
    Peter Walsh

    A Review...of sorts.

    In my previous post I mentioned that I got a book on de-cluttering. It is Does This Clutter Make My Butt Look Fat? by Peter Walsh.

    Anytime a title references a cliche placed on women I get mad however after reading this book it is clear that he's not pointing the finger at women, only at the person holding the book. Walsh describes that weight and weight management are in the eye of the beholder. That a perfect weight is that weight at which you no longer think about your weight. Essentially it isn't "weighing" you down. You can live the life you want to live without turning to your weight problems.

    For some people this is probably a "duh" concept but I think if you struggle with your weight you will find more to his book than a simple - "well do something about it." I also found that his relation of fat and clutter made perfect sense for my life. It put emphasis on prioritizing my life - deciding what is most important to me and realizing why I don't act on those decisions.

    Some of the lines I highlighted for myself:

    • "Do you want to keep the last three years of magazine subscriptions, or do you want to use that dining room table for dinner with your family?"
    • "Clutter is about fear of losing memories, or worry about the future, or a sense that something bad is going to happen."
    • "Just because someone gave you something doesn't mean you have to keep it."
    • "Clutter gets in the way of living the life you want."

    Walsh points out that "fat" and "clutter" can be used interchangeably throughout the book and in his examples. We want material items NOW just as we really want that piece of cake NOW. Both have consequences, some just come sooner than others. If you say you eat out because you don't have time to cook, Walsh will say you didn't plan well enough. A plan is needed for everything - how will you de-clutter? A plan. How will you eat for the week? A plan. He even goes so far as to show you how to map your meals and snacks for a week and clean out your cupboards to only include weekly meal needs. I loved this! I work a crazy schedule (work two days then one day off then work two nights) so it helped me realize when I eat, what I eat, and how I needed to plan to ensure my eating stayed on schedule. 

    As I mention above, Walsh describes cleaning your kitchen cupboards to include only items for that week's meals. He actually goes a bit more in depth - clearing your fridge, pantry, low cupboards, etc. His theme - what is the purpose of this room? What should be in here to fulfill this purpose? Everything else is gone. Thus,  the purpose of the dining room is to eat meals with family. To accomplish this I need a table, plates, silverware, glassware. I don't need the last week of mail, the paperwork I brought home from my shift, the receipts I left for a rebate, and the shampoo that never made it to the bathroom. By having just the table and place settings I immediately have more energy to prepare a better meal instead of thinking on the way home, "crap - the table isn't cleared off. I'm too tired to do it; I'll stop and grab something I can eat before I'm home so I don't have to worry about it." 

    By clearing the table and taking ten minutes each day to put my receipts away, go through the mail, etc actually saves me time in the long run. Instead of spending two hours searching for a pair of pants that fit, an-hour counselling session discussing how I cried in the dressing room, and two-hours waiting to have my blood drawn and tests reviewed to determine if my cholesterol levels had dropped I could spend ten minutes hanging up my coat, sorting my mail, and setting the table for dinner. Sounds like quite the time-saver to me...

    I did start on the kitchen drawers after reading this book. I was actually pretty happy with my choices. Only those utensils and cooking items we needed got to stay in the "main" drawer. I really wish I had a before pictures. Instead I will use a daily quotation from my boyfriend trying to cook dinner "Damn drawer! Where's the spatula?" Rifling through drawer angrily: "I'm so pissed off right now I can't even finish cooking." I moved the main cooking spoons, spatulas, and small things like the potato peeler and measuring spoons to the top drawer. I moved measuring cups and the cooking utensils we may use weekly to the lower door. I purged any cooking item we hadn't used in at least a month. Those that I knew we would still use or need (like my Kitchen Aid attachments) I put in a clear rubbermaid tub in our laundry room (right next to the kitchen). For those I knew we wouldn't use - like the plastic measuring cup that came with the dog food bins - I sent to a non-profit's yard sale. It felt darn good. It's been that way for two weeks and the number of "damns" coming from the kitchen has easily gone down by 80%. 

    Here's a glimpse at one of my works:


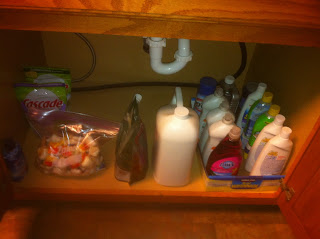
    All the stuff hanging out under the kitchen sink - including a coffee pot we haven't used in two years


    A bit more organized and so much more space!
    Gone: Coffee pot, paper towel holder, three almost empty bottles of spray fragrance, hydrogen peroxide from 2006, drain cover that was too small for the kitchen sink, toothbrush used to clean, and a tub of moldy orchid food pellets.  
    I also consolidated the small bags of dish-washing packs to one large ziplock bag. 


    I will post a complete kitchen de-clutter (once it's done) to show off my other fancy drawer work. In my prior post I set a goal to be done with the de-clutter by this weekend and that sure won't happen, but I feel like I've made some good emotional progress that has systematically instigated physical progress. 
    And the beat goes on...

    Saturday, February 23, 2013

    It's coming...

    So it's been a while since my last post.

    Excuses:

    • Excuse #1 - I work ridiculous shifts. My schedule is a rotating shift of sorts so I work a few 12-hour days and then I work a few 12-hour nights. I also play volleyball. And my commute is an hour each way. So What I'm saying is I don't have a lot of time. 
    • Excuse #2 - I've been in planning mode. 
      • I follow a coupon blog, Queen Bee Coupons. Recently the blogger, Heather, de-cluttered and organized her house in about a week. She chronicled the process here - creating a plan and tackling specific areas daily. It was quite impressive but actually a bit depressing...for me because I truly couldn't figure out how she could do it all. She has mentioned that she is more of a type-A personality when it comes to organization and I am a total Type-B and sentimental, hoarding sap. She is a stay-at-home mom so works 24/7 - although her kids are old enough to help her out a bit with the process. I couldn't figure out how she could do it all - run a highly successful blog, watch two kids, cook, clean, organize, plan. SO I stopped trying to figure it out and just use her work to motivate me to do something to change my current living situation. 
      • Now my personality type (not necessarily Type-B specific) needs to read about my problem before I can do something about it. Perhaps this is procrastination... I was the student, typing the paper at 3am and getting A's. I am a night owl who is most creative under pressure. HA! That's probably why I am writing this post instead of cleaning off the table so it can be moved by tonight. But I know it will all get done. I found that the book Does this Clutter Make My Butt Look Fat? by Peter Walsh was pretty spot on with the issue I have around the house (and my weight). It is a letting go process for me, but one I need to do. 

    So what's the plan?

    • Background
      • I live in a small basement "apartment." The layout is terrible. The combined entry/kitchen/dining/living room/laundry is about 500 square feet. We have one standard size coat closet. 
      • The other half of the basement is also about 500 square feet, but did I mention the layout is terrible? We lose about 100 square feet from the hallway which is just wide enough to walk through. In this second section we have a "den," the bathroom, and a bedroom. In the "den" we lose another 30 square feet because of the non-functional fireplace (no longer code to use it). There is one standard closet in the bedroom, one "hall" closet and one standard closet in the den. the bathroom splits the den and the bedroom (so a door on either side). Essentially we end up with about 600 square feet of "living space." The rest is not usable because of the floor plan. 
      • We have pets - five dogs and three cats. Yes, even in this tiny space. We have carpet in most areas (kitchen and bathroom have vinyl). The genius who chose the carpet went with a light tan so every paw print, spill, and snag shows.
    Not to scale - just to show you how stupid this is. 
    • The Initial Fix
      • Laminate flooring. Yes, we will be pulling out the carpeting in the dining room area and putting in a dark laminate floor. Okay, I won't but my beau will (our agreement since he is a stay-at-home caretaker). 
      • Purchase smaller dining table. I was able to, thanks to a tip from Queen Bee, get a $200 furniture voucher for $49 at a local store. Funny enough I was going to buy a table from them about six months ago and didn't get around to it. See, procrastination pays off. 
      • Read my book. 

    • The Timeline
      • I think one of the best things Heather did was give herself a time-line. Now I know myself well enough that I won't stick to a timeline. I have things get in the way all the time. Things I think are more important at the time. "The Book" already has pointed out that this isn't always true. When I think about all the time I waste because I can't find things and have to move around all the junk in my house, I really do have five minutes a day to put things away. 
      • Flooring needs to be done by Monday, yes this Monday, because I go back to work on Tuesday night AND because we have dogs that need to go out to potty. 
      • Complete de-clutter needs to be done by March 30th. This is the next time I have a long weekend and I want to enjoy it, not be sitting in junk still sorting. There is gardening to do darn it!
    The de-clutter part scares me. I have tried to do this so many times and yet I keep coming back to the same starting place. Even as a little girl I had a messy room, but knew where everything was. I enjoy looking at things from long ago (I majored in history) and see value in keeping these items. I just don't know HOW to keep these items. I read a great blog, Empress of Dirt, that breaks down the type of clutter we have. This really did get me thinking - enough actually that I took two paper grocery bags of stuff to Goodwill last night! It's stuff that "almost" worked for me, but didn't quite work for me and I was holding onto it "just in case it maybe did start to work for me" or because "I could put up with the shortcomings" and my favorite, "because I spent money on it."

    I will start posting before and after pictures as the process kicks into high gear this afternoon (dining area will be cleared out, table will be taken down, and carpet will come up). Fingers crossed this works... 


    Friday, January 4, 2013

    The Laundry Soap Diaries

    Background

    The Pin: 


    The ingredients per instructions: 

    • 4- 4oz. bars of grated Castile soap
    • 1- 78 oz. box of Borax
    • 8- 16 oz. boxes of baking soda
    • 3 tblsp. lavender essential oil
    The directions:
    • Mix it all together. Use 2T per load. 
    Now a few things caught my attention about this pin:
    1. The author had put the soap into a pretty glass jar so the soap actually looks nice. Simple, but I see how this could actually make laundry less annoying. 
    2. The ingredients have the potential to be all natural, vegan, no animal testing. Also, if purchased correctly, all should come in 100% recyclable material. LOVE IT! 
    3. She claimed that the soap would cost less than $25 dollars and be a year's supply. From her other posts it sounds like she has at least one little one so that means more laundry (and tougher stains). 

    The Ingredients 

    First, let me start with the ingredients, where I purchased, and their cost. 
    • 4- 4oz. bars of grated Castile soap 

      • I also bought a bar of Dr. Bronner's lavender Castile soap from drugstore.com for $4.09. I decided to spend the extra on this and not buy the lavender essential oil, which would cost about $10 - $14 for the amount she said to use. 
      • Drugstore.com offers free shipping on orders over $25 so I filled up my cart with 8 bars of Kirk's soap, 1 Dr. Bronner's soap, and a bottle of specialty lotion for my mom. Somehow the order only came to $20.52 and I got free shipping? I'll take it! 
    • 1- 78 oz. box of Borax 
      • Author noted later in her article that the Borax is actually a 76oz box
      • I found this on sale at my local QFC store for $4.29. I'm sure I could have waited for additional discounts or coupons, but this seemed reasonable since I opted out of the essential oil (and I don't support Walmart). 
    • 8- 16 oz. boxes of baking soda
      • Kroger brand baking soda was on sale for $0.69 so I bought the eight boxes I needed. 
    • 3 tblsp. lavender essential oil
      • As I said above, I opted out of this because the price seemed really high. I also figured that substituting the Dr. Bronner's for one bar of the Kirk's would be sufficient. 
    Based on the ingredients I used my batch of soap came to $16.86 before tax (we are at about 9% sales tax in my area so with tax about $18.38). The author also discusses using ebates.com to get money back on her purchase. I personally prefer upromise.com because my funds go directly into my student loan account. You can also set up an education fund for your child. What a nice buffer that would be when they've turned 18... No, I don't get any referral reward either. I got 7% back on my drugstore purchase (so $1 something). 

    The author also says that this equals $0.08/load.She didn't say how she got this, and I as a non-believer/former auditor, had to check her work:


    Ok, so she's right :)

    The only cost I didn't include was the bucket and lid I bought at home depot to mix the stuff in (about $5) and the jars I used to store it (about $0.85 each). Why? The bucket and jars are reusable and therefore a fixed asset in my laundry world. 

    Some may say, wait! I can get some laundry detergent on sale that equals about $0.06/load. This is true, however you should also take into account the paper and ink used to print the coupon and, more importantly, just what is IN that laundry detergent. I looked at my labels and how weird is this...they don't tell you what they ingredients are. Hmmmm. Even the "free and clear" kind. I'll discuss the recycling bit more later. 

    Grating the soap

    In the original recipe she uses a regular cheese grater (and others comment that a food processor works great too). I opted for the hard cheese grater on my hand held cheese grater, the side used to make Parmesan powder. Maybe a little overkill, but I have a phobia of undissolved detergent on my clothes. 


    Notice I did this on a piece of foil? I could have also done this on a cutting board, in a bowl, etc. I used foil because I wanted something super easy to clean up (not that cleaning something with soap on it isn't easy) and something recyclable so that this could be a fully environmental project. 

    The Mixing

    Here's the final product, in the bucket, all mixed together and waiting to be jarred up. Lessons learned: 

    1. Mix outside and on a day when the wind will carry the soap dust away from you. I didn't expect it to have so much kick-back when I mixed it. Inhaling powdery soap wasn't that great. 

    2. If possible, wear gloves or use a tool to mix it. My hands are still cracked and dry from digging down into the powder. 


    The Environment

    • All the packaging was paper and therefore recyclable
    • The foil I used to grate the soap on was recyclable
    • I will reuse the bucket and glass jars. 
    • Both Kirk's and Dr. Bronner's soaps are vegan, cruelty free, and made with natural ingredients (not chemicals). Dr. Bronner's soap is also organic. Both are also made in the USA
    Check your current laundry detergent. Is is cruelty free? Does it list EVERY ingredient used? Does it state that it is made in the USA of natural, not chemical or animal products? Did you know many places still can't recycle the type of plastic detergent bottles are made of AND the lids are not recyclable. 

    I'm not saying this detergent is the best for the environment. I am saying it is better for the environment and the animals not tested on than most mast produced laundry detergents. 
    • Borax (sodium borate) is a naturally occurring mineral that is mined from the earth. That's a TON of environmental impact. 
    • Baking Soda - sodium bicarbonate - is also a product of mining. Soda ash, mined in the form of the ore trona, is dissolved in water and treated with carbon dioxide. Sodium bicarbonate results from this. 
    Unfortunately there isn't a "better" version of either of these. You could find a company that participates in other environmental activities to somewhat offset the mining portion, but we are kind of stuck. (If anyone ever reads this and does know of a lower impact Borax or baking soda option, please post a comment!) 

    Using the Product

    Per other's comments on the original post - this stuff works great! Smells great! No, mine didn't suds at all. Yes, it got the sweat smell out of my volleyball socks and the mud and grass out of my beau's hunting pants. No, there wasn't left over soap on my clothes. Yes, my whites were bright even with the large amount of iron in our water. 

    I'm glad I found this and I know we will always be improving. Dr. Bronner's also has a rose soap. I may have to try this next year (assuming that's when I'll need to make some more). 

    Thanks Hen Pen for the Recipe!


    Resources:
    The Hen Pen - where the pin lead 
    My chemistry 101 class in college - Baking soda roots
    http://www.mindat.org/loc-3484.html - information about Borax Mining

    New Year's Resolutions

    First off - Happy New Year! Granted I have no followers and no page views BUT I figure I need to wish myself a Happy New Year!

    I heard a story on the radio (yes, I'm a radio listener) about New Year's resolutions and that we shouldn't actually tell people our resolutions because the rush of telling someone has been shown to reduce adrenaline and therefore these resolutions are more likely to go to the back and be forgotten. Huh, good thing I have no followers or page views. I'd like to say that's why I'm terrible with resolutions. In reality it's because I have terrible will power and a condition that makes me think of contingency outcomes (to a compulsive level) so by the time I have thought of the contingencies of my actions it's too late to do the original action, thereby allowing me to "not fail" at an action.

    So this year I have one resolution:

    1. be nicer to myself

    Only one?! You think you're that perfect? Hell no. It is the one resolution I could come up with that encompasses any other resolutions I would have had (lose weight, do more art projects, reduce trash output, etc) and the one resolution that I so far cannot come up with contingencies for.

    So once again, Happy New Year!


    Saturday, December 22, 2012

    Washi On Washi Off

    I'm late for the Washi party and from the looks of things on Etsy and Pinterest I am not even fashionably late. I'm like "oh that party was last week" kinda late.

    But then Washi felt sorry for me because I was standing at their door awkwardly so they invited me in for crafts. 

    Today's washi related craft: mail organizers. We have three people living in our house and the mail bin sitting on the kitchen counter overflowith. I also needed some place to drop all my receipts for rebates (yeah, I'm one of those). 

    Supplies:


    Really the instructions are - decorate files, put on wall. I didn't even stack my files! But anyway - picture time:

    Fresh out of the box...

    Washi Tape and 

    Fabric "buttons" with adhesive on the backs.

    Two rows of pattern tape and one silver, plus a button for pizzazz

    Equals: 
    BF's instant comment" "the middle one should have two stripes" (thanks Mr. Asperger) 

    Totally matches the blaze orange. 

    This was just a quick project for me tonight. I plan to write on each  in the lower right corner with fancy writing what should go in (ie - grandma's mail, our mail, receipts). I will post pictures if I don't ruin them. 

    To adhere these to the wall I used the sticky adhesive that came with the files. Because we have so much mail I will probably need to use the drywall screws that also came with the kit. 

    Reference: none this time! I thought of this on my own.